Tag Archives: CSS

Cascading Style Sheets

Overriding Button Styles and Hover Effects – Material UI

Hi everyone,

Just a quick post on how to override the background color and hover effects for buttons in material ui:

Define your class as follows:


const styles = theme => ({
    ...
    greenButton: {
        backgroundColor: green[500],
        color: '#FFF',
        '&:hover': {
            backgroundColor: green[400],
            color: '#FFF'
        }
    }

Then just reference it as you normally would:


const styles = theme => ({

const { classes } = this.props;


How to Add a FontAwesome Icon using :after

Hey everyone,

Just a quick post on how to add a fontawesome icon using :after:


.fl-cart-product-price:after{
content: 'f00d';
font-family: FontAwesome;
font-weight: normal;
font-style: normal;
margin: 0px 0px 0px 10px;
color: #555;
font-size: 85%;
text-decoration: none;
}

See this stackoverflow post for more info: http://stackoverflow.com/a/18793584/522859

How to stop text taking up more than one line – CSS

Hey everyone,

Just a quick post on how to stop text taking up more than one line using only CSS:

.truncate {
  white-space: nowrap;
  overflow: hidden;
  text-overflow: ellipsis;
}

You can check it out using this fiddle: http://jsfiddle.net/wb5m7/
There’s also a great StackOverflow post: http://stackoverflow.com/a/572302/522859

//jsfiddle.net/wb5m7/embed/html,css,result/

Rails Flash Messages in MVC4

Hey everyone,

Coming from Rails I’d grown quite fond of flash messages. Unfortunately there isn’t a built in way of doing this in MVC4. Luckily, there’s a five minute solution posted on StackOverflow: http://stackoverflow.com/a/11809178/522859

Once implemented, it works just like in Rails:

this.Flash("We need you to login before you can edit anything.", FlashEnum.Warning);

Definitely worth checking out if you’ve got time, even more so if you’ve come over from Rails!

Twitter Bootstrap – Carousel Only CSS

Hey everyone,

I ran into a bit of an issue today with my stylesheet conflicting with Bootstrap. After a bit of tinkering I realised that all I really needed from bootstrap were the Carousel styles. I’ve taken everything else out and included everything that’s left below:

.carousel {
  position: relative;
}
.carousel-inner {
  position: relative;
  overflow: hidden;
  width: 100%;
}
.carousel-inner > .item {
  display: none;
  position: relative;
  -webkit-transition: 0.6s ease-in-out left;
  transition: 0.6s ease-in-out left;
}
.carousel-inner > .item > img,
.carousel-inner > .item > a > img {
  line-height: 1;
}
.carousel-inner > .active,
.carousel-inner > .next,
.carousel-inner > .prev {
  display: block;
}
.carousel-inner > .active {
  left: 0;
}
.carousel-inner > .next,
.carousel-inner > .prev {
  position: absolute;
  top: 0;
  width: 100%;
}
.carousel-inner > .next {
  left: 100%;
}
.carousel-inner > .prev {
  left: -100%;
}
.carousel-inner > .next.left,
.carousel-inner > .prev.right {
  left: 0;
}
.carousel-inner > .active.left {
  left: -100%;
}
.carousel-inner > .active.right {
  left: 100%;
}
.carousel-control {
  position: absolute;
  top: 0;
  left: 0;
  bottom: 0;
  width: 15%;
  opacity: .5;
  filter: alpha(opacity=50);
  font-size: 20px;
  color: #fff;
  text-align: center;
  text-shadow: 0 1px 2px rgba(0, 0, 0, 0.6);
}
.carousel-control.left {
  background-image: -webkit-linear-gradient(left, color-stop(rgba(0, 0, 0, 0.5) 0), color-stop(rgba(0, 0, 0, 0.0001) 100%));
  background-image: linear-gradient(to right, rgba(0, 0, 0, 0.5) 0, rgba(0, 0, 0, 0.0001) 100%);
  background-repeat: repeat-x;
  filter: progid:DXImageTransform.Microsoft.gradient(startColorstr='#80000000', endColorstr='#00000000', GradientType=1);
}
.carousel-control.right {
  left: auto;
  right: 0;
  background-image: -webkit-linear-gradient(left, color-stop(rgba(0, 0, 0, 0.0001) 0), color-stop(rgba(0, 0, 0, 0.5) 100%));
  background-image: linear-gradient(to right, rgba(0, 0, 0, 0.0001) 0, rgba(0, 0, 0, 0.5) 100%);
  background-repeat: repeat-x;
  filter: progid:DXImageTransform.Microsoft.gradient(startColorstr='#00000000', endColorstr='#80000000', GradientType=1);
}
.carousel-control:hover,
.carousel-control:focus {
  outline: none;
  color: #fff;
  text-decoration: none;
  opacity: .9;
  filter: alpha(opacity=90);
}
.carousel-control .icon-prev,
.carousel-control .icon-next,
.carousel-control .glyphicon-chevron-left,
.carousel-control .glyphicon-chevron-right {
  position: absolute;
  top: 50%;
  z-index: 5;
  display: inline-block;
}
.carousel-control .icon-prev,
.carousel-control .glyphicon-chevron-left {
  left: 50%;
}
.carousel-control .icon-next,
.carousel-control .glyphicon-chevron-right {
  right: 50%;
}
.carousel-control .icon-prev,
.carousel-control .icon-next {
  width: 20px;
  height: 20px;
  margin-top: -10px;
  margin-left: -10px;
  font-family: serif;
}
.carousel-control .icon-prev:before {
  content: '2039';
}
.carousel-control .icon-next:before {
  content: '203a';
}
.carousel-indicators {
  position: absolute;
  bottom: 10px;
  left: 50%;
  z-index: 15;
  width: 60%;
  margin-left: -30%;
  padding-left: 0;
  list-style: none;
  text-align: center;
}
.carousel-indicators li {
  display: inline-block;
  width: 10px;
  height: 10px;
  margin: 1px;
  text-indent: -999px;
  border: 1px solid #fff;
  border-radius: 10px;
  cursor: pointer;
  background-color: #000 9;
  background-color: rgba(0, 0, 0, 0);
}
.carousel-indicators .active {
  margin: 0;
  width: 12px;
  height: 12px;
  background-color: #ffffff;
}
.carousel-caption {
  position: absolute;
  left: 15%;
  right: 15%;
  bottom: 20px;
  z-index: 10;
  padding-top: 20px;
  padding-bottom: 20px;
  color: #fff;
  text-align: center;
  text-shadow: 0 1px 2px rgba(0, 0, 0, 0.6);
}
.carousel-caption .btn {
  text-shadow: none;
}
@media screen and (min-width: 768px) {
  .carousel-control .glyphicon-chevron-left,
  .carousel-control .glyphicon-chevron-right,
  .carousel-control .icon-prev,
  .carousel-control .icon-next {
    width: 30px;
    height: 30px;
    margin-top: -15px;
    margin-left: -15px;
    font-size: 30px;
  }
  .carousel-caption {
    left: 20%;
    right: 20%;
    padding-bottom: 30px;
  }
  .carousel-indicators {
    bottom: 20px;
  }
}

Minified:

.carousel{position:relative}.carousel-inner{position:relative;overflow:hidden;width:100%}.carousel-inner>.item{display:none;position:relative;-webkit-transition:.6s ease-in-out left;transition:.6s ease-in-out left}.carousel-inner>.item>a>img,.carousel-inner>.item>img{line-height:1}.carousel-inner>.active,.carousel-inner>.next,.carousel-inner>.prev{display:block}.carousel-inner>.active{left:0}.carousel-inner>.next,.carousel-inner>.prev{position:absolute;top:0;width:100%}.carousel-inner>.next{left:100%}.carousel-inner>.prev{left:-100%}.carousel-inner>.next.left,.carousel-inner>.prev.right{left:0}.carousel-inner>.active.left{left:-100%}.carousel-inner>.active.right{left:100%}.carousel-control{position:absolute;top:0;left:0;bottom:0;width:15%;opacity:.5;filter:alpha(opacity=50);font-size:20px;color:#fff;text-align:center;text-shadow:0 1px 2px rgba(0,0,0,.6)}.carousel-control.left{background-image:-webkit-linear-gradient(left,color-stop(rgba(0,0,0,.5)0),color-stop(rgba(0,0,0,.0001)100%));background-image:linear-gradient(to right,rgba(0,0,0,.5)0,rgba(0,0,0,.0001)100%);background-repeat:repeat-x;filter:progid:DXImageTransform.Microsoft.gradient(startColorstr='#80000000', endColorstr='#00000000', GradientType=1)}.carousel-control.right{left:auto;right:0;background-image:-webkit-linear-gradient(left,color-stop(rgba(0,0,0,.0001)0),color-stop(rgba(0,0,0,.5)100%));background-image:linear-gradient(to right,rgba(0,0,0,.0001)0,rgba(0,0,0,.5)100%);background-repeat:repeat-x;filter:progid:DXImageTransform.Microsoft.gradient(startColorstr='#00000000', endColorstr='#80000000', GradientType=1)}.carousel-control:focus,.carousel-control:hover{outline:0;color:#fff;text-decoration:none;opacity:.9;filter:alpha(opacity=90)}.carousel-control .glyphicon-chevron-left,.carousel-control .glyphicon-chevron-right,.carousel-control .icon-next,.carousel-control .icon-prev{position:absolute;top:50%;z-index:5;display:inline-block}.carousel-control .glyphicon-chevron-left,.carousel-control .icon-prev{left:50%}.carousel-control .glyphicon-chevron-right,.carousel-control .icon-next{right:50%}.carousel-control .icon-next,.carousel-control .icon-prev{width:20px;height:20px;margin-top:-10px;margin-left:-10px;font-family:serif}.carousel-control .icon-prev:before{content:'2039'}.carousel-control .icon-next:before{content:'203a'}.carousel-indicators{position:absolute;bottom:10px;left:50%;z-index:15;width:60%;margin-left:-30%;padding-left:0;list-style:none;text-align:center}.carousel-indicators li{display:inline-block;width:10px;height:10px;margin:1px;text-indent:-999px;border:1px solid #fff;border-radius:10px;cursor:pointer;background-color:#000 9;background-color:rgba(0,0,0,0)}.carousel-indicators .active{margin:0;width:12px;height:12px;background-color:#fff}.carousel-caption{position:absolute;left:15%;right:15%;bottom:20px;z-index:10;padding-top:20px;padding-bottom:20px;color:#fff;text-align:center;text-shadow:0 1px 2px rgba(0,0,0,.6)}.carousel-caption .btn{text-shadow:none}@media screen and (min-width:768px){.carousel-control .glyphicon-chevron-left,.carousel-control .glyphicon-chevron-right,.carousel-control .icon-next,.carousel-control .icon-prev{width:30px;height:30px;margin-top:-15px;margin-left:-15px;font-size:30px}.carousel-caption{left:20%;right:20%;padding-bottom:30px}.carousel-indicators{bottom:20px}}

Let me know if you have any other issues.
Random Class Directive – AngularJS

Hey everyone,

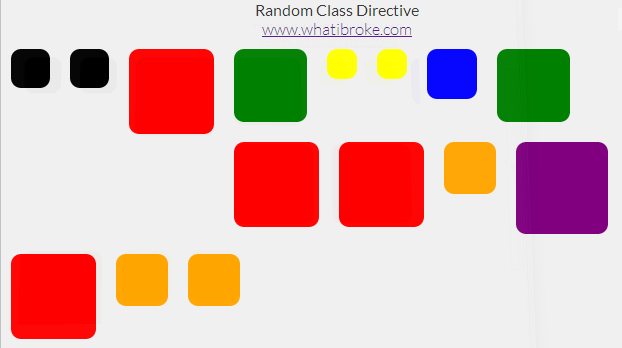
Just another small directive. This one adds a random class from the provided array to the element.

Check out this fiddle to see the demo: http://jsfiddle.net/uvSVj/3/

Random Background Directive

Random Background Directive

I used this directive to add a random background to each of my wrapper divs:

Random Background Real World Usage

To use it in your app simply define a list of classes in your controller:

app.controller("MyCtrl", function MyCtrl($scope) {
    
    /* A random class is picked from this list */
    $scope.classes = [
        //"bg-buildings",
        "red",
        "blue",
        "yellow",
        "green",
        "orange",
        "black",
        "purple"
    ];        
});

Then add the directive to your page (can be an existing element):

A random class will then be selected from the list and appended to the elements current list of classes (if any).

The easiest way to see how it’s done is probably just to check out the fiddle above, but there’s a code dump below if you need it:

The Random Class Directive

app.directive("ngRandomClass", function () {
    return {
        restrict: 'EA',
        replace: false,
        scope: {
            ngClasses: "="
        },
        link: function (scope, elem, attr) {            

            //Add random background class to selected element
            elem.addClass(scope.ngClasses[Math.floor(Math.random() * (scope.ngClasses.length))]);
        }
    }
});

Sample Html

Random Class Directive

www.whatibroke.com

Sample JS

/* 
    http://www.whatibroke.com/?p=899
    Adds a random class to element
    Usage: add ng-random-class to element
*/

var app = angular.module('myApp', []);

app.controller("MyCtrl", function MyCtrl($scope) {
    
    /* A random class is picked from this list */
    $scope.classes = [
        //"bg-buildings",
        "red",
        "blue",
        "yellow",
        "green",
        "orange",
        "black",
        "purple"
    ];        
});

Sample Styles

/* Just a demo div */
.test{
    width: 50px;
    height: 50px;
    margin: 10px;
    padding: 5px;
    float: left;   
    -webkit-transition: 400ms linear all;
	-moz-transition: 400ms linear all;
	-ms-transition: 400ms linear all;
	-o-transition: 400ms linear all;
	transition: 400ms linear all;
    cursor: pointer;
    border-radius: 10px;    
}

.test:hover{
    opacity: 0.8;    
}

body{
	background-color: #F0F0F0;
	font-family: "Lato", sans-serif;
	font-weight: 300;
	color: #363636;
    text-align: center;
    vertical-align: middle;
}

/* Random classes */
.red {
    background-color: red !important;
    height: 75px;
    width: 75px;
}

.blue {
    background-color: blue !important;
    height: 40px;
    width: 40px;
}

.yellow {
    background-color: yellow !important;
    height: 20px;
    width: 20px;
}

.green {
    background-color: green !important;
    height: 63px;
    width: 63px;
}
.purple {
    background-color: purple !important;
    height: 82px;
    width: 82px;
}
.black {
    background-color: black !important;
    height: 29px;
    width: 29px;
}
.orange {
    background-color: orange !important;
    width: 42px;
    height: 42px;
}

Let me know if you run into any issues and feel free to use/change however you want.

TimeSelector / TimePicker Directive – AngularJS

Hey everyone,

I’ve been mucking around with directives for that last few days and one of my requirements has been a simple timepicker. Nothing too fancy, but if anyone would like to use it – feel free.

See the following fiddle for the demo: http://jsfiddle.net/LFB3F/2/

Timepicker Directive

Timepicker Directive

The directive is initialised with both the hour and minute defaults being set like this:


Note that hours and minutes should be set in the controller that wraps around the Timepicker:

app.controller("MyCtrl", function MyCtrl($scope) {
    $scope.hours = 11;
    $scope.minutes = 45;       
});

The hours and minutes will then be updated whenever the user changes the value. If you need any other hooks it’s fairly easy to modify and there are a heap of comments.

You may also want to put the HTML in an external template. Just make the following changes to the directive (note templateURL):

app.directive("ngTimeSelector", function () {
    return {
        restrict: 'EA',
        templateUrl: '/Directives/TimeSelector',
        scope: {
            hours: "=",
            minutes: "="
        },
        replace: true,
        link: function (scope, elem, attr) {
...
...

The JSFiddle is probably the easiest way to see how it all works. You can simply copy it from there to your app. Alternatively, I’ve dumped the code below:

Uncondensed HTML (for those who prefer to use a template)

{{displayHours()}}
{{displayMinutes()}}
= 12" class="display"> PM
<div ng-if="hours AM

Timepicker Directive

/* 
    http://www.whatibroke.com/?p=899
*/

var app = angular.module('myApp', []);

app.controller("MyCtrl", function MyCtrl($scope) {
    $scope.hours = 11;
    $scope.minutes = 45;       
});


app.directive("ngTimeSelector", function () {
    return {
        restrict: 'EA',
        template: '
{{displayHours()}}
{{displayMinutes()}}
= 12" class="display"> PM
<div ng-if="hours AM