EC2 Instance Setup
Create a new EC2 instance. This example was done on amazon-linux but I think it would probably be better to use ubuntu next time.
If you do use ubuntu note that you’ll need to use apt instead of yum and will likely have to open ports 80 and 443 on the instance.
All instance types will need to have ports 443 and 80 opened via your linked security group.
Creating the backend domain
I have purchased a domain name from namecheap (~$1.50/yr). To get it this cheap it needs to be 6-10 numbers only with the xyz extension.
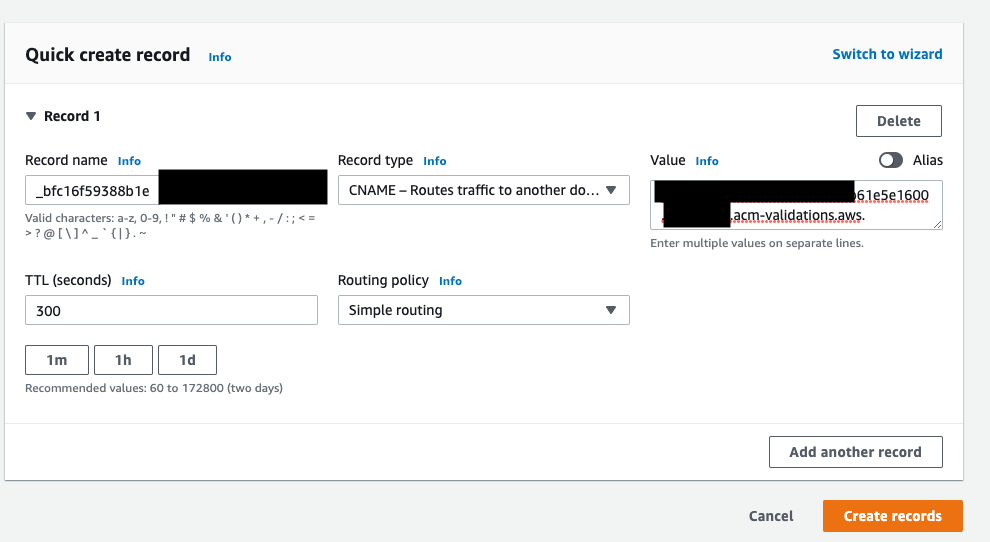
To manage dns via route53 we create a new hosted zone and then add the following nameservers on namecheap’s dns manager:
ns-596.awsdns-10.net.
ns-348.awsdns-43.com.
ns-1820.awsdns-35.co.uk.
ns-1429.awsdns-50.org.
We then create a subdomain called mysite1.1234567892.xyz and point it to the EC2 instance’s public IP in route53 19.100.124.17 (as an A record). This will be used for the certificate as well.
Nginx
Installation, note that if using the ubuntu you will need to use apt instead of yum.
sudo yum update
sudo yum install nginx
Verify that its running with systemctl status nginx
Create the configuration:
- Create a new directory called
sites-enabled:sudo mkdir /etc/nginx/sites-enabled - Edit the http block using
sudo nano /etc/nginx/nginx.confand add this line:include /etc/nginx/sites-enabled/*; - Create the configuration file:
sudo nano /etc/nginx/sites-enabled/1234567892
Add the following values to the config file:
server {
  listen 80;
  server_name mysite1.1234567892.xyz;
  location / {
    proxy_set_header  X-Real-IP  $remote_addr;
    proxy_set_header  Host       $http_host;
    proxy_pass        http://127.0.0.1:4800;
  }
}

server {
  listen 80;
  server_name mysite2.1234567892.xyz;
  location / {
    proxy_set_header  X-Real-IP  $remote_addr;
    proxy_set_header  Host       $http_host;
    proxy_pass        http://127.0.0.1:4500;
  }
}
Restart nginx with sudo systemctl restart nginx. Check status again with: systemctl status nginx. To test, go to http://19.100.124.17/ and be sure that it showing as http, not https. Accessing the full http url http://mysite1.1234567892.xyz/ will give a bad gateway error until the application is deployed.
Setup Golang
Here are the steps to install GoLang on an Amazon Linux EC2 instance:
- First, connect to your EC2 instance using SSH.
- Once connected, update the package lists for upgrades and new package installations:
sudo yum update -y - Download the GoLang package. You can find the URL of the latest version on the official website:
wget https://golang.org/dl/go1.22.3.linux-amd64.tar.gz - Extract it:
sudo tar -C /usr/local -xzf go1.22.3.linux-amd64.tar.gz - Set the Go environment variables. Add these lines to the
/etc/profilefile (or to the specific user’s profile, like~/.bash_profileor~/.bashrc):export PATH=$PATH:/usr/local/go/bin
export GOPATH=$HOME/go
export PATH=$PATH:$GOPATH/bin - Source the profile:
source /etc/profile - Check it installed correctly:
go version
Add and then run the following go script on your EC2 instance:
package main

import (
	"errors"
	"fmt"
	"io"
	"net/http"
	"os"
)

func getRoot(w http.ResponseWriter, r *http.Request) {
	fmt.Printf("/ request\n")
	io.WriteString(w, "Website #1!\n")
}
func getPing(w http.ResponseWriter, r *http.Request) {
	fmt.Printf("got /ping request\n")
	io.WriteString(w, "pong HTTP!\n")
}

func main() {
	http.HandleFunc("/", getRoot)
	http.HandleFunc("/ping", getPing)

	err := http.ListenAndServe(":4800", nil)
	if errors.Is(err, http.ErrServerClosed) {
		fmt.Printf("server closed\n")
	} else if err != nil {
		fmt.Printf("error starting server: %s\n", err)
		os.Exit(1)
	}
}
You should then be able to see your application by visit your domain, for example http://mysite1.1234567892.xyz/. We haven’t setup ssl yet so make sure you’ve got http for the protocol.
Setting up SSL
Firstly, we need to setup letsencryt/certbot:
sudo dnf install python3 augeas-libssudo python3 -m venv /opt/certbotsudo /opt/certbot/bin/pip install --upgrade pipsudo /opt/certbot/bin/pip install certbot certbot-nginxsudo ln -s /opt/certbot/bin/certbot /usr/bin/certbot
Create a certificate: sudo certbot -n -d mysite1.1234567892.xyz --nginx --agree-tos --email your-email+mysite1@gmail.com
This will also add entries to /etc/nginx/sites-enabled/1234567892. You can also setup auto-renew : https://eff-certbot.readthedocs.io/en/latest/using.html#setting-up-automated-renewal
Your sites should now be accessible via https, for example: https://mysite1.1234567892.xyz/
Thanks to the following links for the info:
– https://eff-certbot.readthedocs.io/en/latest/using.html#setting-up-automated-renewal
– https://gist.github.com/rschuetzler/793f478fa656cca57181261a266ec127
– https://www.digitalocean.com/community/tutorials/how-to-configure-nginx-as-a-reverse-proxy-on-ubuntu-22-04