Adding a Custom Domain Name – AWS SAM

Hi everyone,

It’s been a long time but I’m messing around with AWS SAM again. I’m currently converting www.testerwidgets.com into an AWS SAM application. As part of this I needed to add a custom domain. Unfortunately, the doco on how to do this isn’t great so I’m going to share what ended up working for me just in case it helps someone else.

To start, these are the resources that you’ll need in your template.yaml:

Resources:

  ApiCertificate:
    Type: AWS::CertificateManager::Certificate
    Properties:
      DomainName: !Sub api-${Stage}.YOUR_DOMAIN.com
      ValidationMethod: DNS

  ApiGatewayApi:
    Type: AWS::Serverless::Api
    Properties:
      StageName: !Ref Stage
      # Allows www.YOUR_DOMAIN.com to call these APIs
      # SAM will automatically add AllowMethods with a list of methods for this API
      Cors: "'www.YOUR_DOMAIN.com'"
      EndpointConfiguration: REGIONAL
      Domain:
        DomainName: !Sub api-${Stage}.YOUR_DOMAIN.com
        CertificateArn: !Ref ApiCertificate
        Route53:
          HostedZoneName: "YOUR_DOMAIN.com." # NOTE: The period at the end is required

You’ll also need to make sure your reference the gateway from your function:

  # This lambda function handles is used to test endpoint availability.
  getPing:
    Type: AWS::Serverless::Function
    Properties:
      Handler: src/handlers/get-ping.getPingHandler
      Runtime: nodejs14.x
      Architectures:
        - x86_64
      MemorySize: 128
      Timeout: 30
      Events:
        Api:
          Type: Api
          Properties:
            Path: /ping2 # NOTE: AWS overrides the ping command.
            Method: GET
            RestApiId:
              Ref: ApiGatewayApi # NOTE: Make sure you have this referencing correctly.
      Description: Responds with 'Pong' if successful.

Now when you run AWS deploy it will continue as usual until it gets to the stage of creating your certificate:

Here it is looking for a specific DNS entry in order to confirm that you own the domain. You’ll need to go into Route53 (or whichever other DNS provider you’re using) and add a CNAME entry with the specified details:

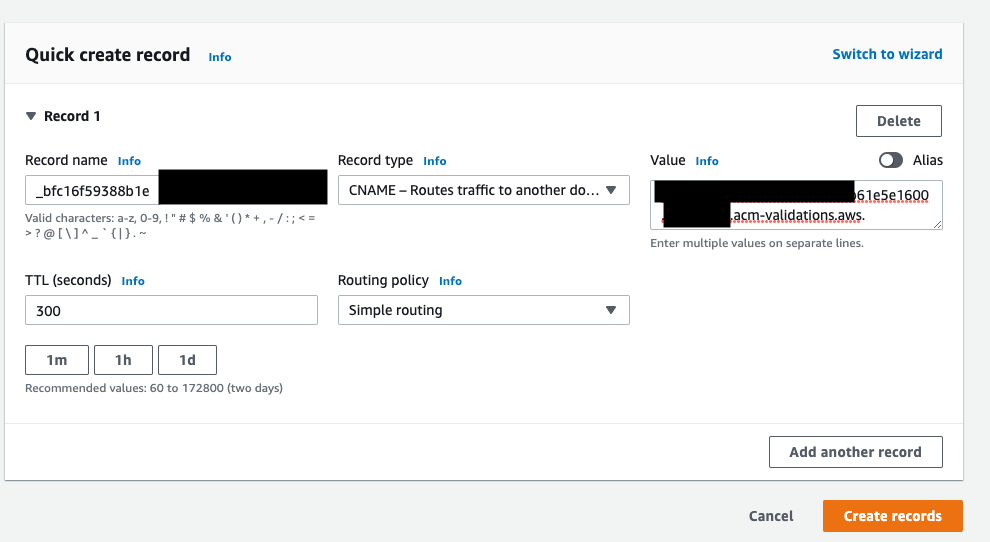
Note that your name and value contents should come from the output of the ApiCertificate job (highlighted in the screenshot above).

Once that’s done you’ll need to wait about sixty seconds for the DNS records to propagate within AWS. You should then be able to access your api using the new domain:

Thanks to the follow github post for the pointers in the right direction: https://github.com/aws/aws-sam-cli/issues/2290

aws sam No hosted zones named found

Note that if you get the error above when trying to deploy please ensure that you’ve added the trailing “.” to your Route53 HostedZoneName in the api-gateway in your template.yaml:

Domain:
        DomainName: !Sub api-${Stage}.yourdomain.com
        CertificateArn: !Ref ApiCertificate
        Route53:
          HostedZoneName: "your-domain.com." # NOTE: The period at the end is required

Access to fetch from origin has been blocked by CORS policy – AWS SAM Local

Hi everyone,

I’ve been using AWS SAM local lately and ran into a bit of an issue with CORS. It took a looong time to find a solution that worked for all of my local scenarios so hopefully this will be able to help someone else out.

Access to fetch at 'http://127.0.0.1:3000' from origin 'http://localhost:3001' has been blocked by CORS policy: Response to preflight request doesn't pass access control check: No 'Access-Control-Allow-Origin' header is present on the requested resource. If an opaque response serves your needs, set the request's mode to 'no-cors' to fetch the resource with CORS disabled.

The error above is fairly typical when working with APIs. The request will work from tools such as postman and fiddler but browsers will block it. These are a few good links that explain why CORS is necessary:
https://medium.com/@electra_chong/what-is-cors-what-is-it-used-for-308cafa4df1a
https://stackoverflow.com/a/29167709/522859

As for the solution, add the following to your template.yml:

  PreFlightFunction:
    Type: AWS::Serverless::Function
    Properties:
      Handler: functions/generic/cors.getPreflightHandler
      Runtime: nodejs8.10
      Events:
        GetEvent:
          Type: Api
          Properties:
            Path: /pages
            Method: options
            RestApiId: !Ref XXXApi
            Auth:
              Authorizer: NONE

If you haven’t already defined your api in your template.yml file there is a default/omitted one created for you. There are a few examples on the AWS github: https://github.com/awslabs/serverless-application-model/blob/release/v1.8.0/examples/2016-10-31/api_cognito_auth/template.yaml

The next thing to do is to create a handler for the options request:


/* Handles retrieving a specific page */
exports.getPreflightHandler = async (event, context, callback) => {
    callback(null, { body: {} }, headers: { 'content-type': 'application/json', 'Access-Control-Allow-Origin': '*', 'Access-Control-Allow-Headers': 'Content-Type,X-Amz-Date,Authorization,X-Api-Key,X-Amz-Security-Token', 'Access-Control-Allow-Methods': 'OPTIONS,GET,POST,PUT,PATCH,DELETE', 'Access-Control-Allow-Credentials': true }, statusCode: 200 })
};

I’ve moved all mine out to some helper methods but the above should be enough to get it working for you. Hopefully the AWS team will have a simpler solution soon but if you run into any issues in the meantime please let me know!

Get User Id in Lambda node.js

Hi everyone,

A quick post on where to find the user id (sub) in a lambda requested that has been authenticated with a congito authorizer.

You’ll be able to find everything you need in the event object under requestContext > authorizer > claims:


exports.viewContextHandler = async (event, context, callback) => {
    console.log(JSON.stringify(event.requestContext));
}

"requestContext": {
    "resourceId": "XXXXX",
    "authorizer": {
        "claims": {
            "at_hash": "XXXXX",
            "sub": "XXXXX-XXXXX-XXXXX-XXXXX-XXXXX",
            "aud": "XXXXX12341234512345XXXXX",
            "email_verified": "true",
            "token_use": "id",
            "auth_time": "1547371205",
            "iss": "https://cognito-XXXXX.com/XXXXX",
            "cognito:username": "XXXXX-XXXXX-XXXXX-XXXXX-XXXXX",
            "exp": "Sun Jan 13 10:20:05 UTC 2019",
            "iat": "Sun Jan 13 09:20:05 UTC 2019",
            "email": "XXXXX@XXXXX.XXXXX"
        }
    },
}

Upload an Image to S3 Using Post and a Presigned Url

Hi everyone,

Today I’ve been converting my “PUT” upload to S3 to a “POST”. The main motivator for this was to restrict the file size of uploads using a signed policy. Unfortunately this was a pretty tedious process and the error responses from S3 were very vague. Thankfully it’s working now and here’s what I needed to do!

Here’s an excerpt from my nodejs lambda function that generates the presigned url:

/* Creates a pre-signed upload url and then stores a reference in a table */
exports.createUploadUrl = async params => {

    var { databaseHandler, bucketHandler } = params;

    // Create id for upload
    var uploadId = uuidv4();

    // Retrieve pre-signed url
    var bucketDataPromise = createPresignedPostPromise({
        Bucket: process.env.BUCKET_UPLOADS,
        Expires: 60 * 60,
        Conditions: [            
            ["content-length-range", 0, 300000], // 300kb
            [ "eq", "$key", uploadId],
            [ "eq", "$Content-Type", 'image/jpeg' ],
        ]
    });

    // var ddbData = await ddbDataPromise;
    var bucketData = await bucketDataPromise;

    // Wait for database handler to complete operation and then return
    return Helpers.generateResponse({
        data: {
            uploadData: bucketData,
            additionalFields: {
                key: uploadId,
                "Content-Type": 'image/jpeg',
            },
        },
        statusCode: 200
    });
}

You can then retrieve the upload details using a request like the following (Python):

resp = requests.put("https://f86caxqe9f.execute-api.ap-southeast-2.amazonaws.com/Prod/images", data=open(path, 'rb'))

This will return a response similar to the following:

{
    "messages": [],
    "data": {
        "uploadUrl": {
            "url": "YOUR UPLOAD URL",
            "fields": {
                "bucket": "YOUR BUCKET",
                "X-Amz-Algorithm": "AWS4-HMAC-SHA256",
                "X-Amz-Credential": "XXX",
                "X-Amz-Date": "20190107T125044Z",
                "X-Amz-Security-Token": "SECURITY_TOKEN",
                "Policy": "YOUR BASE64 ENCODED POLICY",
                "X-Amz-Signature": "SIGNATURE"
            }
        },
        "uploadId": "UPLOAD_ID"
    }
}

And once you have those details you can use them to upload the image:

# Attempt to retrieve upload url etc
json = resp.json()
data = json["data"]
uploadUrl = data["uploadData"]["url"]
uploadFields = data["uploadData"]["fields"]
uploadFields.update(data["additionalFields"])

try:
    print("Uploading image...",end='')
    headers = {'Content-Type': 'multipart/form-data' }
    files = { 'file': open(path, 'rb')}
    resp = requests.post(uploadUrl, data=uploadFields, files=files)

    # Only show content if there's an error
    if resp.status_code == 200:
        print("Uploaded")
    else:  
        print("ERROR")                          
        print(repr(resp))
        print(repr(resp.content))

except Exception as e:
    print("\r\nFailed to upload image.")
    print("Upload data:")
    print(repr(uploadFields))
    print("Exception:")
    print(repr(e))
    traceback.print_exc()

Hopefully that’s been able to help you out, but feel free to let me know in the comments below if you need more info!

Thanks to these links for the info:
https://stackoverflow.com/a/35923104/522859
https://stackoverflow.com/a/49311831/522859

AWS SAM Cheat Sheet/Quick Reference

Hi everyone,

This will just be a living cheat sheet or quick reference for using AWS SAM with nodejs. I’ll add to it as I find things that are useful or I might need again.

General AWS SAM Info:

Description Example More
Validate template sam validate
Start AWS Sam Locally https://docs.aws.amazon.com/serverless-application-model/latest/developerguide/serverless-quick-start.html
Access config variable in Lambda const CAT_BREED_TABLE = process.env.CAT_BREED_TABLE; https://stackoverflow.com/a/48491845/522859
Dynamically reference another resource in template.yml CAT_BREED_TABLE: !Ref DynamoDbCatBreedTable https://docs.aws.amazon.com/AWSCloudFormation/latest/UserGuide/intrinsic-function-reference-ref.html

Dynamo DB Local Info:

Description Example More
Create table aws dynamodb create-table –table-name CatBreeds –attribute-definitions AttributeName=CatBreedId,AttributeType=S –key-schema AttributeName=CatBreedId,KeyType=HASH –provisioned-throughput ReadCapacityUnits=5,WriteCapacityUnits=5
–endpoint-url http://192.168.0.31:8000
https://docs.aws.amazon.com/amazondynamodb/latest/developerguide/Tools.CLI.html
List Tables aws dynamodb list-tables –endpoint-url http://192.168.0.31:8000 https://docs.aws.amazon.com/amazondynamodb/latest/developerguide/Tools.CLI.html
List All Rows in Table aws dynamodb scan –table-name PestinatorTable –endpoint-url http://192.168.0.31:8000 https://stackoverflow.com/a/52236600/522859

Node.js Info:

Description Example More
Run tests npm test

Parsing DynamoDB Items – AWS Lambda with Node.js

Hi everyone,

A quick post on how to parse DynamoDB items into something more readable when using lambda with Node.js:

Original:

console.log(data["Item"]);

{
    CatBreedId: { S: '17acbc81-2b4a-462b-be87-bcc49580b1ae'},
    Name: { S: 'Cat #1'}
}

Parsed:

console.log(AWS.DynamoDB.Converter.unmarshall(data["Item"]));

{
    "CatBreedId": "17acbc81-2b4a-462b-be87-bcc49580b1ae",
    "Name": "Cat #1"
}

Official doco is here: https://docs.aws.amazon.com/AWSJavaScriptSDK/latest/AWS/DynamoDB/Converter.html

Thanks to the following stackoverflow post for the info: https://stackoverflow.com/a/44536616/522859

Check if Running Locally – AWS SAM & NodeJS

Hi everyone,

Just a quick post on how to check if code is being run locally with AWS SAM and NodeJS:

// 8+
isRunningLocally = () => {
    return process.env.AWS_SAM_LOCAL === 'true';
}

// 6+
function isRunningLocally() {
    return process.env.AWS_SAM_LOCAL === 'true';
}

AWS 2_ContinuousDeliveryPipeline Tutorial – Error: no test specified

Hi everyone,

I ran into the following error while completing an AWS tutorial: https://github.com/aws-samples/aws-serverless-workshops/tree/master/DevOps/2_ContinuousDeliveryPipeline

C:UsersChris-PCsourcereposUniApiuni-apitest>npm test

> uni-api-test@1.0.0 test C:UsersChris-PCsourcereposUniApiuni-api
> echo ‘Error: no test specified’

‘Error: no test specified’

The solution was to add the following line to my package.json file:

“scripts”: {“test”: “mocha”}

Now when running npm test I get the expected test output:

4 passing (24ms)
1 failing

1) Reading Unicorns
errors on missing unicorn data:

AssertionError [ERR_ASSERTION]: 500 == 404
+ expected – actual

-500
+404

at lambda.lambda_handler (testread.spec.js:77:20)
at appread.js:20:10
at Object.get (testread.spec.js:34:33)
at Object.exports.lambda_handler (appread.js:18:13)
at Context. (testread.spec.js:65:16)

npm ERR! Test failed. See above for more details.

Thanks to this link for the answer: https://teamtreehouse.com/community/when-i-run-test-i-am-getting-an-error-that-says-no-test-specified

An error occurred (UnrecognizedClientException) when calling the CreateFunction operation: The security token included in the request is invalid.

Hi everyone,

I ran into the following error today while attempting to create a Lambda function using the CLI:

An error occurred (UnrecognizedClientException) when calling the CreateFunction operation: The security token included in the request is invalid.

The first thing to check is that your aws config is setup correctly. For me this is under c:userschris-pc.aws.

If that looks fine, double check that the associated user has the correct rights by viewing the IAM page in the server console: https://console.aws.amazon.com/iam/home

Finally, ensure that the user has programmatic access and that the keys match those in your config.