Using Postman with .net gRPC endpoints

Hey everyone,

Just a quick post on how to use postman with a gRPC endpoint using .net core.

Add the grpc reflection package to your project:

dotnet add package Grpc.AspNetCore.Server.Reflection

Add to the container and include the middleware in your program.cs:

builder.Services.AddGrpc();

# Add this line.
builder.Services.AddGrpcReflection();

var app = builder.Build();

app.MapGrpcService<GreeterService>();

# Add this line.
app.MapGrpcReflectionService();

Startup your project and then open postman. Create a new gRPC request by:

  • Clicking file > new
  • Select gRPC Request (currently has a beta tag)
  • Enter your url e.g. localhost:20257
  • Click Using server reflection Refresh

You should now be able to see your gRPC service listed to the right. Click the Invoke button.

Thanks to the following links for the info:

System.IO.IOException with a .NET gRPC Project on Mac

Hey everyone,


I created a new gRPC project with Visual Studio on a Mac and ran into the following error when trying to run it:

System.IO.IOException
...
http/2 over tls is not supported on macos due to missing alpn support

It turns out that Kestrel does not support HTTP/2 with TLS on MacOS. In order to get around it we end up having to configure it to not use TLS.

In program.cs, add the lines below with your HTTP port (e.g. 20257):

var builder = WebApplication.CreateBuilder(args);

builder.WebHost.ConfigureKestrel(options =>
{
    // Setup a HTTP/2 endpoint without TLS.
    options.ListenLocalhost(20257, o => o.Protocols =
        HttpProtocols.Http2);
});

Thanks to the following links for the info:

Reset USB Devices on RaspberryPi Ubuntu

Hey everyone,

I ran into a small issue today on my RaspberryPi. Occasionally, when restarting scripts that utilised usb devices (lidar, arduino) the usb connections were locking up. This meant that when I tried to restart the scripts I wasn’t able to reconnect.

My initial solution was to simply restart the Pi each time it occurred. Unfortunately, this became pretty tedious when testing required a lot of relaunching.

In order to get around having to restart each time I used usbreset in a small script attached to my launch files. This allowed me to ensure that all usb devices were ready to go.

for id in $(lsusb | grep -oP 'ID \S+' | awk '{print $2}'); do
    echo "Resetting device $id"
    sudo usbreset "$id"
    sleep 1  # Add a small delay between resets
done

Note that you can also simply paste this into your shell. This was done on a RaspberryPi that has been imaged with Ubuntu, but I expect it will work on Raspbian as well.

Automatically Shutdown a RaspberryPi when the Network is not Reachable

Hi everyone,

I’ve had a bit of an issue recently with my RaspberryPi disconnecting when I’m flooding the network with camera images. Unfortunately I’m using a dodgy TP-Link WiFi range extender and it doesn’t handle the load well at all.

The issue with this is that it means I cannot connect to the RaspberryPi to safely shut it down. I can switch off the power but this risks corrupting the SD card. In order to get around this I added a script to automatically shutdown when the Pi cannot reach my server for 30 seconds (with help from Co-Pilot!).

target_ip="192.168.0.1"  # Replace with your target IP address
ping_timeout=30           # Timeout in seconds
while true; do
    if ping -c 1 -W $ping_timeout $target_ip >/dev/null; then
        echo "Target IP is reachable."
    else
        echo "Target IP is not reachable. Initiating shutdown..."
        sudo shutdown -h now  # Change to "poweroff" if "shutdown" is not available
    fi
    sleep 1
done

To use the script:

  • 1. Open a text editor and paste the script into a new file.
  • 2. Replace the target_ip variable with the IP address you want to monitor.
  • 3. Save the file with a .sh extension (e.g., shutdown_script.sh).
  • 4. Open a terminal and navigate to the directory where you saved the script.
  • 5. Make the script executable by running the following command: chmod +x shutdown_script.sh.
  • 6. Run the script using the following command: ./shutdown_script.sh.

The script will continuously ping the target IP address every second. If the target IP becomes unreachable for 30 seconds, it will shutdown the pi. You might need to run the script with root privileges (sudo) to execute the shutdown command successfully.

To test it I pointed the script at a VM on my main computer and then paused the VM.

chris@robot1:~/robot_ws/src/my_bot$ sudo ./auto_shutdown.sh
[sudo] password for chris: 
Target IP is reachable.
...
Target IP is reachable.
Target IP is not reachable. Initiating shutdown...

I then tried pinging the Pi from my main computer to confirm it had shutdown:

Chris@Chriss-Mini-8 Journal % ping 192.168.0.123
PING 192.168.0.123 (192.168.0.123): 56 data bytes
ping: sendto: Host is down

Hydroponics Robot Part 6 – Polygon Object Detection

Hi everyone,

It’s been a while since I’ve posted an update on the the hydroponics robot but I’m definitely still working on it! I’m currently working on aligning the robot’s pot lift with “catches” on the plant pots.

I’ve tried a few approaches for this one, but the current plan is to use polygon object detection in order to generate rotated bounding boxes.

I’ve used standard bounding boxes with Pytorch as well as Tensorflow a few times. Thankfully these are fairly easy to setup, however they do not provide any information on rotation which can make exact locations difficult to calculate.

For example, see the image below (from stackoverflow).

The first rectangle is highlighted in red with a standard bounding box. The second rectangle uses a “rotated” bounding box and provides a much clearer indication of the rectangles exact location.

I tried a lot of different solutions in order to try and get this working. Eventually, I came across this repository here: https://github.com/XinzeLee/PolygonObjectDetection

Using Google Colab and little bit of tinkering created a detector that provided me with an accurate location of my pot hooks within the robot’s camera frame.

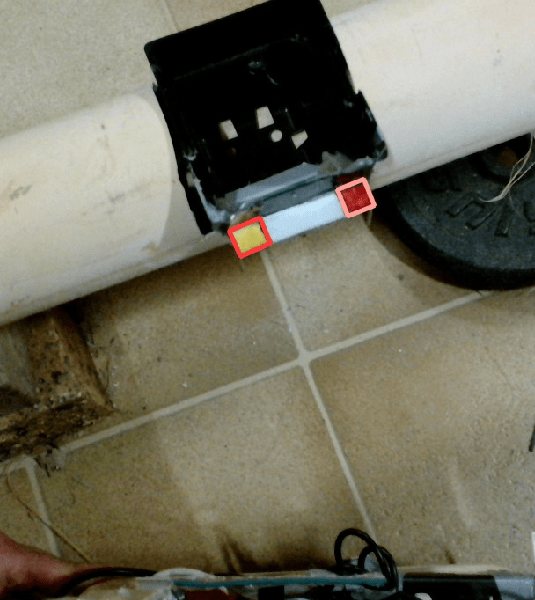
Below is the output from processing a real image taken from the robot. The detector has correctly highlighted both the left (yellow) and right (red) pot hooks and drawn a rotated bounding box around each.

Now that I’m able to determine where the pot is located I am moving on to getting the robot to adjust its location. Ideally, I will be able to move the robot’s lift mechanism directly under the hooks and then lift the pot.

Anyway, that’s all from me for now – I’ll post another update once this part is all working!

Hydroponics Robot Part 5 – Lane Navigation

In this blog post, I will be sharing the latest progress I made on my hydroponics robot. I last left it with goal accuracy issues and the wheel tread falling off.

I started off by gluing the wheel tread back onto the robot, and then proceeded to run it through the lane in laps. The robot was doing well overall, but I noticed that it seemed to get stuck when going around the corner from the start of each lane when going back to base. While it was able to recover on its own most of the time, I did encounter an error once that said “Invalid path, Path is empty.”

To address this issue, I hypothesized that moving the “start point” further out of the aisle might help the robot avoid the sharp corner. I tested this theory, and found that it seemed to work well. However, I also realized that part of the original problem was that after the robot reached the end of the aisle, I hadn’t tasked it with returning to the start of that aisle before moving to the next. It’s unclear which of these solutions had more of an effect, but the good news is that the robot no longer gets stuck at all.

Unfortunately, I ran into another issue – I was running very low on battery. I had to recharge the robot before I could continue testing. In addition to recharging the battery, I also started setting up recharger plates. I used copper pipe for the bot and copper plant tags spread across fencing tie wire for the charger connection. All of this was connected to a retail 12v battery charger.

Overall, I’m happy with the progress I made on Part 5 of the project. I was able to identify and address a key issue that was causing the robot to get stuck, and I also started setting up a recharging system. I will continue to work on this project and keep you updated on my progress. Thanks for reading!

Hydroponics Robot Part 4 – Nav2 Goal Accuracy

Welcome back to the Hydroponics Robot project! In this update, I will be discussing some of the challenges I faced while trying to improve the navigation accuracy of my robot.

In the previous update, I mentioned that I was having trouble with the robot getting stuck halfway to its destination. After experimenting with DWB critics, I decided to add multiple waypoints to guide the robot to its target location. This approach involved first getting to the lane and then moving to the specific pot. This solution has worked well for me so far.

During my exploration of the navigation system, I came across some useful references. For example, I found that goal_distance_bias (deprecated, replaced by GoalAlign/scale and GoalDist/scale) and PathDist.scale could be used to adjust the goal distance bias. Additionally, I referred to the following issue on GitHub for further guidance: https://github.com/ros-planning/navigation2/issues/201.

Moving on to getting more precise when reaching a goal, I switched to the precise_goal_checker and significantly reduced the xy_goal_tolerance and yaw_goal_tolerance. However, the robot seemed to be getting stuck when close to the goal. I tried adjusting min_theta and max and in velocities, but the problem persisted. Eventually, I tried removing the RotateToGoal critic, and the issue was instantly resolved.

I guess that the RotateToGoal critic may have been kicking in too early. It would get the angle correct but still be too far away from the goal and unable to get closer. I reverted the velocity parameters and continued to use the commander API to get the bot to go between different locations.

To use the commander API, I had to re-lookup how to get the initial coordinates in a format that worked for a PoseStamped. I found that I could use an initialpose published in rviz2. Running ros2 topic echo /initialpos helped me see the output. I then set up additional posts to the start and end of each column.

Unfortunately, while working on the project, one of the wheel treads came off, and I had to spend some time repairing it. After the repair, I called it a day.

That’s all for this update. Stay tuned for more updates on the Hydroponics Robot project!

Hydroponics Robot Part 3 – Mapping Issues Continued

Hydroponics Robot Part 3 – Mapping Issues Continued

Welcome back to the third part of my series on building a hydroponics robot! In this blog post, I’ll continue discussing the mapping issues I encountered while trying to navigate my robot through narrow passages and plant rows.

Increasing the global costmap

Previously, I tried increasing the global costmap to see if it would improve my robot’s alignment with the rows when it returned. Unfortunately, this didn’t seem to be enough, and the issue persisted. I suspected that the robot’s slight backward angle could be causing the problem, so I decided to try leveling it and see if it would help.

Leveling the robot

I attempted to level the robot to see if it would improve its alignment with the rows when it returned. If leveling the robot works, I may consider getting a gimble for it. However, since I couldn’t find a gimble on short notice, I ended up hot gluing two pringles can lids to the bottom of the bot as a temporary fix.

Recreating the map

Despite my efforts, I still had trouble with alignment and localization drifting. I suspected that I may need to recreate the map since different parts of the robot were having similar issues now.

Re-configuring the initial pose

I also re-configured the initial pose in nav2 so that I don’t have to keep resetting it. This should save me some time and effort during testing and troubleshooting.

Adjusting the parameters

I spent a lot of time messing around with params, but I was still unable to get the robot to navigate around a post without the localization drifting and getting stuck in a recovery loop. One config that did appear to have been missed was that the behavior global_frame was still set to odom instead of map.

Loads of trial and error, but sigma_hit under in nav2 config under amcl appeared to have significantly reduced drifting.

Repairing the tire tread

During my testing, I noticed that the tread of the tire (pvc end cap with rubber glued to it) was lost, so I needed to repair that before continuing.

Trouble navigating through a narrow passage

The robot was still hitting issues exiting a narrow passage but had no problems entering it. It actually seemed to be having trouble going from the middle of the lane to the other lane when the goal was within local costmap vision. I suspect that PathExpiringTimer may have helped with this, but I could not get it to work (probably set it in the wrong place).

I will consider writing a separate blog post about this issue. In the meantime, there’s more information about PathExpiringTimer in the links below:


And that’s it for this blog post! Despite the mapping issues, I’m still making progress with my hydroponics robot, and I’m excited to continue experimenting and tweaking it to get it just right. Stay tuned for more updates in the next part of this series!

Hydroponics Robot Part 2 – Map Resolution

In my work with hydroponics robots, I recently faced challenges related to robot localization and map resolution. After consulting with ChatGPT, I discovered that the lidar and map were not synchronizing properly due to issues with the robot’s odometry.

Fortunately, I was able to resolve the issue and the robot is now able to navigate between two lanes successfully multiple times. However, I still had concerns about the map resolution and decided to test creating the map in a higher resolution.

While this initially proved challenging, I discovered that I had been using the wrong launch file. After fixing this issue, I started with a resolution of 0.01 but found it to be too slow. I then increased the resolution to 0.025 and found that it looked much crisper than the previous 0.05 resolution. Moreover, I did not encounter any issues with the map drifting while generating it, which was a significant improvement from my previous attempts.

However, my virtual machine struggled to process the map with the local cost map and global cost map both set to 25mm. To address this issue, I plan to increase the global cost map to 50mm to see if it helps with processing.

Improving robot localization and map resolution is crucial for the success of hydroponics robots, and I am excited to continue exploring ways to optimize these processes for even better results.

Hydroponics Robot Part 1 – Troubleshooting Robot Localization Issues

I recently faced a challenge when testing the robot’s ability to navigate back and forth between two rows of pipes. Despite several attempts, the robot kept getting stuck, and I suspected that there might be a localization issue causing it to drift from the map.

I turned to ChatGPT for advice, and it suggested calling global_localization occasionally to resync the lidar with the map. However, when I tried to run the command ros2 run amcl global_localization, I received an error message saying that the package amcl could not be found.

I then noticed that my launch file references nav2_amcl, so I asked ChatGPT if there was a difference between the two packages. After some clarification, ChatGPT suggested running ros2 run nav2_amcl global_localization instead. However, this command also returned an error message saying that no executable was found.

Although this seemed to confuse ChatGPT, I did not give up. I tried running ros2 service call /reinitialize_global_localization std_srvs/srv/Empty, which seemed to do something, but the new location was not accurate at all. In fact, each time I re-ran the command, it picked a random location on the map, which was not consistent.

I plan to continue investigating the global_localization command to see if it can help me resync the lidar with the map. I’ll keep you updated on my progress in future blog posts.

In the meantime, if you’ve faced similar localization issues, I’d love to hear from you. Let me know in the comments how you solved the problem, or if you have any other tips or suggestions.