Using a USB Drive for a swap file on a RaspberryPi Zero 2

Here are all the commands required condensed into a single script (thanks Copilot):

#!/bin/bash

USB_MOUNT="/media/usb"
SWAPFILE="$USB_MOUNT/swapfile"

# Check if USB drive is mounted
if mountpoint -q "$USB_MOUNT"; then
    echo "USB drive found at $USB_MOUNT."
    # Check if swap file exists
    if [ -f "$SWAPFILE" ]; then
        echo "Swap file already exists at $SWAPFILE."
    else
        echo "Creating 1GB swap file at $SWAPFILE..."
        sudo dd if=/dev/zero of="$SWAPFILE" bs=1M count=1024 status=progress
        sudo chmod 600 "$SWAPFILE"
        sudo mkswap "$SWAPFILE"
        echo "Swap file created."
    fi
    # Enable swap
    sudo swapon "$SWAPFILE"
    echo "Swap enabled."
else
    echo "No USB drive found at $USB_MOUNT."
fi

This is for a 1GB swap file (double the ram on the pi). However, you can increase it as much as you’d like on line #14. Just be aware that the benefits drop off pretty quickly beyond this point.

Note that I’m running this on startup with a readonly fs and don’t want it there permanently in case the usb stick fails. In order to accomodate this there is a bunch of extra logic to abort if it already exists, can’t be found, etc. If you aren’t working with these constraints you should be fine to cut that logic out or simply run it the once.

As an example, here’s the output on a second run:

toad7@toad7:~/toadbot $ ./usb-swap.sh
USB drive found at /media/usb.
Swap file already exists at /media/usb/swapfile.
swapon: /media/usb/swapfile: insecure permissions 0755, 0600 suggested.
swapon: /media/usb/swapfile: swapon failed: Device or resource busy
Swap enabled.
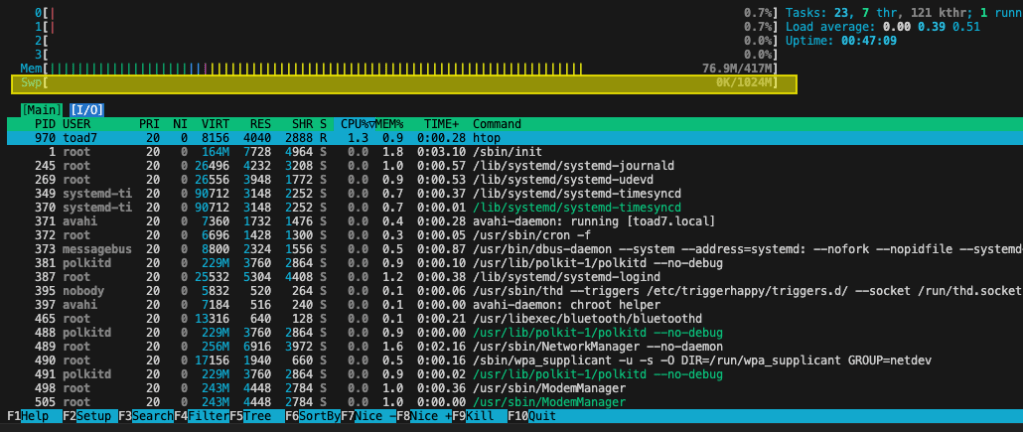
toad7@toad7:~/toadbot $ 

Then checking htop to verify that it’s working:

And finally, running a script that forces swap space usage:

Just one small warning, using swap on a usb drive is very slow. You may also want to reduce swappiness in order to help improve performance:

toad7@toad7:~ $ cat /proc/sys/vm/swappiness
60
toad7@toad7:~ $ sudo sysctl vm.swappiness=10
vm.swappiness = 10

Automatically Shutdown a RaspberryPi when the Network is not Reachable

Hi everyone,

I’ve had a bit of an issue recently with my RaspberryPi disconnecting when I’m flooding the network with camera images. Unfortunately I’m using a dodgy TP-Link WiFi range extender and it doesn’t handle the load well at all.

The issue with this is that it means I cannot connect to the RaspberryPi to safely shut it down. I can switch off the power but this risks corrupting the SD card. In order to get around this I added a script to automatically shutdown when the Pi cannot reach my server for 30 seconds (with help from Co-Pilot!).

target_ip="192.168.0.1"  # Replace with your target IP address
ping_timeout=30           # Timeout in seconds
while true; do
    if ping -c 1 -W $ping_timeout $target_ip >/dev/null; then
        echo "Target IP is reachable."
    else
        echo "Target IP is not reachable. Initiating shutdown..."
        sudo shutdown -h now  # Change to "poweroff" if "shutdown" is not available
    fi
    sleep 1
done

To use the script:

  • 1. Open a text editor and paste the script into a new file.
  • 2. Replace the target_ip variable with the IP address you want to monitor.
  • 3. Save the file with a .sh extension (e.g., shutdown_script.sh).
  • 4. Open a terminal and navigate to the directory where you saved the script.
  • 5. Make the script executable by running the following command: chmod +x shutdown_script.sh.
  • 6. Run the script using the following command: ./shutdown_script.sh.

The script will continuously ping the target IP address every second. If the target IP becomes unreachable for 30 seconds, it will shutdown the pi. You might need to run the script with root privileges (sudo) to execute the shutdown command successfully.

To test it I pointed the script at a VM on my main computer and then paused the VM.

chris@robot1:~/robot_ws/src/my_bot$ sudo ./auto_shutdown.sh
[sudo] password for chris: 
Target IP is reachable.
...
Target IP is reachable.
Target IP is not reachable. Initiating shutdown...

I then tried pinging the Pi from my main computer to confirm it had shutdown:

Chris@Chriss-Mini-8 Journal % ping 192.168.0.123
PING 192.168.0.123 (192.168.0.123): 56 data bytes
ping: sendto: Host is down

The current operating system is not capable of running this task. That typically means the task was written for Windows only. For example, written for Windows Desktop PowerShell. – AzureFileCopy@4

Hi everyone,

I am currently setting up an azure pipeline to deploy a ReactApp to a Blob storage container. I was a bit surprised when I hit the following error with an Ubuntu pool:

Task         : Azure file copy
Description  : Copy files to Azure Blob Storage or virtual machines
Version      : 4.184.1
Author       : Microsoft Corporation
Help         : https://docs.microsoft.com/azure/devops/pipelines/tasks/deploy/azure-file-copy
==============================================================================
##[error]The current operating system is not capable of running this task. That typically means the task was written for Windows only. For example, written for Windows Desktop PowerShell.
##[debug]System.InvalidOperationException: The current operating system is not capable of running this task. That typically means the task was written for Windows only. For example, written for Windows Desktop PowerShell.
   at Microsoft.VisualStudio.Services.Agent.Worker.TaskRunner.RunAsync()
   at Microsoft.VisualStudio.Services.Agent.Worker.StepsRunner.RunStepAsync(IStep step, CancellationToken jobCancellationToken)

I did a quick search in the task lists and couldn’t find anything specifically for Linux. A bit of Googling brought up an open Github thread stating that there currently isn’t a built in task to address this issue.

The next best alternative is to use the AzureCli task and invoke it that way:

- task: AzureCLI@1
    displayName: Deploy the UI
    inputs:
      azureSubscription: $(azureSubscription)
      scriptLocation: inlineScript
      inlineScript: |
        az storage blob upload-batch \
          --destination \$web \
          --account-name "$(storageAccountName)" \
          --source "$(Agent.BuildDirectory)/$(outputDir)"

I’ve linked the GitHub issue below. It has a few alternatives to this task as well so worth reading if you’re having issues: https://github.com/microsoft/azure-pipelines-tasks/issues/8920#issuecomment-640596461

Setup MongoDB on an Azure VM

Hi everyone,

I’m currently using a small linux vm to host a MongoDB instance on Azure. These are the steps I followed:

## MongoDB

### Install
https://docs.mongodb.com/manual/tutorial/install-mongodb-on-ubuntu/

1. Import the public key: `wget -qO - https://www.mongodb.org/static/pgp/server-4.4.asc | sudo apt-key add -`
2. Create a list file:  `echo "deb [ arch=amd64,arm64 ] https://repo.mongodb.org/apt/ubuntu bionic/mongodb-org/4.4 multiverse" | sudo tee /etc/apt/sources.list.d/mongodb-org-4.4.list`
   - This is for Ubuntu 18.04, check version using `lsb_release -a` 
3. Reload the local package database: `sudo apt-get update`
4. Install MongoDb: `sudo apt-get install -y mongodb-org`
5. Pin the version to prevent automatic upgrades 
```
echo "mongodb-org hold" | sudo dpkg --set-selections
echo "mongodb-org-server hold" | sudo dpkg --set-selections
echo "mongodb-org-shell hold" | sudo dpkg --set-selections
echo "mongodb-org-mongos hold" | sudo dpkg --set-selections
echo "mongodb-org-tools hold" | sudo dpkg --set-selections
```

### Allow remote access
https://www.digitalocean.com/community/tutorials/how-to-configure-remote-access-for-mongodb-on-ubuntu-20-04

1. sudo nano /etc/mongod.conf
2. Find the `network interfaces` section
3. Find the `bindIp` value
4. Append the public ip of your vm to this address list `bindIp: 0.0.0.0`
   - *Note that this is the VM ip not the ip of the machine you plan to connect from.*
5. Restart MongoDB `sudo systemctl restart mongod`

### Add authentication
1. Connect to the instance from an ssh connection: `mongo --port 27017'
2. Create the user:
https://stackoverflow.com/a/38921949/522859
```
db.createUser(
  {
    user: "YOUR_USERNAME",
    pwd: "YOUR_PASSWORD",
    roles: [ { role: "root", db: "admin" } ]
  }
)
```
3. Restart with access control: `mongod --auth --port 27017 --dbpath /data/db1`
4. Authenticate as the user adminstrator: `mongo --port 27017 -u "YOUR_USERNAME" -p "YOUR_PASSWORD"  --authenticationDatabase "admin"`
5. Locate the commented out security heading and uncomment it.
6. Add `authorized: enabled`
```
security:
  authorization: enabled
```
7. Restart with access control: `mongod --auth --port 27017 --dbpath /data/db1` 

Setup PostgreSQL on an Azure VM

Hi everyone,

I’m currently testing out a small linux vm with PostgreSQL on Azure. Just sharing the steps for future reference and hopefully it’ll be able to help you out as well.

# Setup PostgreSQL on Azure VM

## Run updates
sudo apt-get update
sudo apt-get install postgresql

## Setup postgresql.conf
1. sudo vim /etc/postgresql/10/main/postgresql.conf
2. Add or uncomment `listen_addresses = '*'`

## Update pg_hba.conf
1. sudo nano /etc/postgresql/10/main/pg_hba.conf
2. Add the following line `host    all             all             151.XXX.XXX.XXX/32        md5` *\*where the ip is your public ip*
3. Restart pgsql `invoke-rc.d postgresql restart`

## Setup a PostgreSQL user
https://serverfault.com/a/248162/148152  

1. sudo -u postgres psql postgres
2. postgres=# \password postgres
3. Enter a new password and then confirm it.

## Done
You should now be able to login remotely (I was using pgAdmin from Windows for this).

Good luck!

Update Wireless Info on Raspberry Pi

Hi everyone,

Just a quick post on how to configure wireless info on a raspberry pi. To start with, open the config file:

sudo nano /etc/wpa_supplicant/wpa_supplicant.conf

You can then add any number of connections to the file with varying priorities:

ctrl_interface=DIR=/var/run/wpa_supplicant GROUP=netdev
update_config=1
country=AU

network={
        ssid="Mobile Network"
        psk="YOUR_PASSWORD"
        key_mgmt=WPA-PSK
        priority=2
}

network={
        ssid="Home Network"
        psk="YOUR_PASSWORD"
        key_mgmt=WPA-PSK
        priority=10
}

Then save the file. Your raspberry pi will now connect to the network with the highest priority first (home network), when that’s not available it will use the network with the lower priority (mobile network).

The official doco is actually pretty good for this use case if you need more info: https://www.raspberrypi.org/documentation/configuration/wireless/wireless-cli.md

Start a Script on Startup – Raspberry Pi

Hey guys,

Just thought I’d leave a couple of links to some guides I came across for setting up boot scripts on a raspberry pi.

Quick guide on how to get them running: http://www.instructables.com/id/Raspberry-Pi-Launch-Python-script-on-startup/

How to delay the boot process until the network is available: https://raspberrypi.stackexchange.com/a/45774